
Caring for your furry companions involves various tasks to keep them healthy and happy, and one often dreaded but necessary task is trimming their nails. Regularly trimming your pet’s nails can prevent discomfort, pain, and potential health issues. However, many pet owners find the task daunting and challenging. Here’s everything you need to know to master this skill:
Why Nail Trimming Matters
Trimming your pet’s nails isn’t just about aesthetics; it’s crucial for their health. Overgrown nails can cause discomfort, affect their gait, curl into their paw pads and can even lead to infections, mobility issues and joint problems over time. Plus, long nails are also more likely to get caught on surfaces, potentially causing injury or leading to painful splits or breaks.
Understanding Pet Nail Anatomy
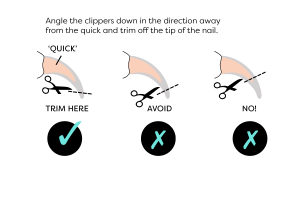
Before you begin trimming, it’s helpful to understand the anatomy of your pet’s nails. Both cats and dogs have a vein inside their nails called the quick. Cutting into the quick can be painful and may cause bleeding. The quick appears as a pinkish area visible through light-colored nails but can be more challenging to see in dark nails.
Tools You Will Need
Before you start trimming your pet’s nails, gather the necessary tools: pet-specific nail clippers (either guillotine-style or scissor-style), styptic powder or a styptic pencil (to stop bleeding if you accidentally cut the quick) and treats to reward your pet afterward.

Step-by-Step Guide the Trimming Your Pet’s Nails
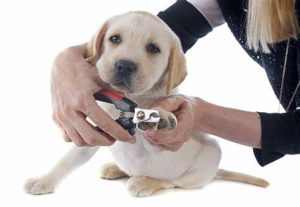
- Get your pet comfortable: Choose a quiet, well-lit area for the nail trimming session. If your pet is nervous, consider introducing the clippers gradually over several days to reduce anxiety.
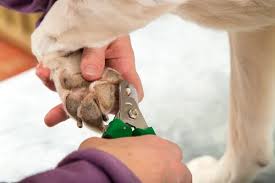
- Hold your pet securely: For dogs, gently hold their paw and apply slight pressure to extend the nail. For cats, you may need to wrap them in a towel to keep them calm and prevent scratching.
- Identify the quick: Look for the pinkish area inside the nail. Aim to trim just before the quick to avoid cutting into it.
- Make the cut: Hold your pet’s paw gently but firmly. Trim the tip of the nail at a 45-degree angle, avoiding the quick. If you are unsure, it’s better to trim a small amount at a time.
- Monitor and reward: After each nail, check for signs of stress or bleeding. If bleeding occurs, apply styptic powder or pencil to stop it. Reward your pet with treats and praise throughout the process to create positive associations.
Tips for Success
- Start early: Introduce nail trimming to your pet as early as possible to acclimate them to the process.
- Take breaks: If your pet becomes anxious or agitated, take breaks and resume later to avoid stress.
- Regular trimming: Regularly check your pet’s nails for signs of overgrowth. Aim to trim your pet’s nails every 2-4 weeks to maintain optimal nail length.
Final Thoughts
Mastering the art of trimming your pet’s nails takes practice and patience, but it’s an essential part of their grooming routine. By following these steps and tips, you can help ensure your furry friends have healthy, comfortable paws and a positive experience during nail trimming sessions.
Remember, if you’re unsure or uncomfortable trimming your pet’s nails yourself, you can always seek guidance from a professional groomer or veterinarian. Your pet’s well-being is always worth the effort!


Leave a Reply